Here is a concise guide for getting VoLTE updates on your Zenfone 2 Laser (ZE550KL). This will unlock the “True 4G” or “Rich Calling” (for Jio) or HD calling capabilities.
The hardware of your Zenfone 2 phone is capable of hosting an LTE Cat4 network with a maximum download and upload speed of 100-150 Mbps. So why not use your device well and get the most out of it with a simple update?
The Current Scenario:
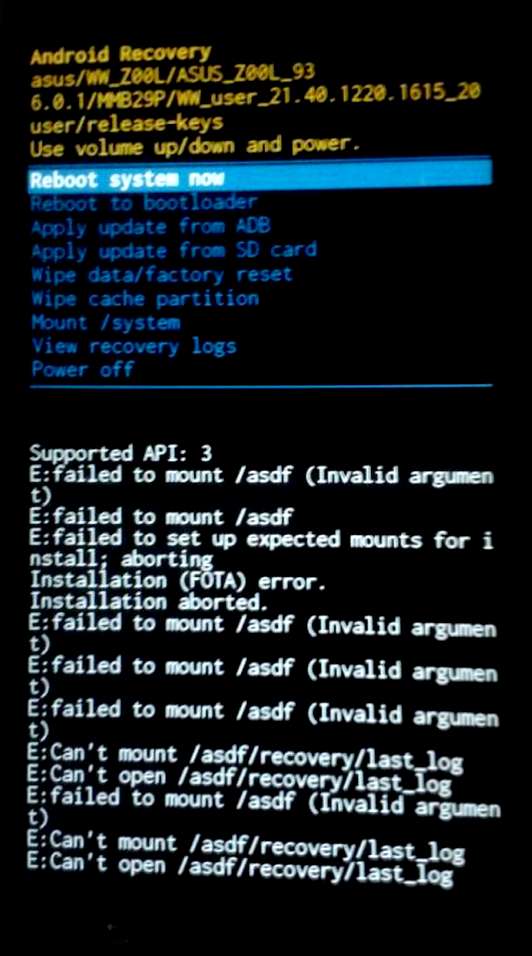
There is a notification on your Zenfone that appears saying, “An update is available”. Or you checked for the latest OTA (Over-The-Air) update manually. Then you downloaded the update files. The phone asks you to restart to further continue with the update installation. The phone restarts itself and boots into stock recovery mode. BUT! You might end with:
Supported API:3
E:failed to mount /asdf (Invalid argument)
E:failed to mount /asdf
E:failed to set up expected mounts for install; aborting
E:failed to mount /asdf (Invalid argument)
E:failed to mount /asdf (Invalid argument)
E:failed to mount /asdf (Invalid argument)
E:Can't mount /asdf/recovery/last_log
E:Can't open /asdf/recovery/last_log
E:Can't mount /asdf/recovery/last_log(Invalid argument)
E:Can't mount /asdf/recovery/last_log
E:Can't open /asdf/recovery/last_log

Now you can see the system is unable to mount or open /asdf partition for formatting. This is the main reason for those errors when you try to perform factory resets or flashing (writing updates to memory) OTA updates. This may have pissed you off, so how to solve this? This may be one of the reasons you ended up on this page. So let’s dive in and start with the process, shall we?
Also, if you are wondering what is ASDF? Well, it stands for Abnormal Shutdown Detection Feature (ASDF).
I was in the same scenario when I published this post. I decided to wait for the OEM (Original Equipment Manufacturer) ASUS to provide an update with a patch for this. But nothing seemed to work out. Then after searching and experimenting with various methods/steps/guides/tutorials on the Internet. I devised simple steps that worked well for me.
I am going to mention two methods. Go with method 1 first if it fails to proceed with method 2. So without taking much time. Let’s start:
Warning: Before proceeding, please make a backup of your personal data. You may lose your data while performing the following steps. Also, ensure the battery is above 50%, just to be safe.
Disclaimer: You might brick your phone or it might be completely unusable. FOLLOW THESE AT YOUR OWN RISK! Any problems you encounter or global nuclear wars you cause while following these steps are your own responsibility. If something goes wrong (such as a power outage or loose cable) in the middle of the flashing, it will soft-brick your phone. If you don’t know how to deal with such things, take your phone to a proper service centre instead of following this post.
1st Method (Using Stock Recovery)
Download the Firmware Update (Stock ROM):
- You can download the update file directly on your SD-card (observe NOT internal storage) or you can transfer the downloaded file from your PC as per convenience.
- Make sure to place the downloaded file, i.e. UL-Z00L-WW-21.40.1220.2196-user.zip on the uppermost directory of the SD-card (NOT in any folder).
- Go to ASUS Zenfone 2 Laser Support site for downloading the Firmware update.
- On Driver & Tools tab, select OS: Android and then under Firmware download from the Global link.
Prepare Your Device:
- Power off your Device.
- Now hold down the Volume Down Key and Power Key simultaneously, and wait for 3 seconds.
- The device would boot into stock Android System Recovery Mode, now go to (Use Volume buttons to navigate Up/Down and Power Button to select) wipe data/factory reset and select yes, then back on the recovery menu go to wipe cache partition.
Installing The Update:
- Go to apply update from sdcard.
- Navigate to UL-Z00L-WW-21.40.1220.2196-user.zip file, and press Power Button to select the file.
Note: If you are still getting the /asdf /recovery errors, then follow Method 2, if not then continue.
- Wait for the process to complete, it may take around 15-20 minutes to complete, have patience.
- If you get the success message after the system has been patched unconditionally process, then wipe the data/factory and cache partition again to ensure complete cleanup.
Then select reboot system now and wait for the boot process to complete. It may again take 15-20 minutes because, for the first boot, the system optimises the apps and builds the cache. If you don’t have patience, then, of course, you can hard reboot, by long pressing the Power button and restarting the device. (NOT Recommended)
2nd Method (Clearing ASDF partition)
This method is intended to solve /asdf related errors, we will use a custom recovery called TWRP other than stock recovery to wipe asdf and system partitions which were not possible with stock recovery.
Requirements
- Install ADB Drivers on your PC.
- Install Minimal ADB & Fastboot 1.4.3 again on your PC.
-
Go to this Cloud Drive and select the directory with your existing build version, download only boot.img and recovery.img from it and place these two files in adb folder (This folder will be generated after adb & fastboot installation.)
- Download TWRP Recovery for ASUS ZenFone 2 Laser (Code Name: Z00L) and copy this too in adb folder.
Have The Firmware Update (Stock ROM) Downloaded, if not, follow these steps:
- You can download the update file directly on your SD-card (observe NOT internal storage) or you can transfer the downloaded file from your PC as per convenience.
- Make sure to place the downloaded file i.e. UL-Z00L-WW-21.40.1220.2196-user.zip on the uppermost directory of the sd-card (NOT in any folder).
- Go to ASUS Zenfone 2 Laser Support site for downloading the update.
- On Driver & Tools tab, select OS: Android and then under Firmware download from the Global link.
Installing TWRP with ADB and Fastboot
- First, enable Developer Mode, Go To Setting>About>Software Information>Build Number (Click 7 times) then “You Are Developer Now” message will appear.
- Now enable USB Debugging in Developer Mode from Setting and connect your phone to PC via USB cable.
- Now open Command Prompt (cmd) in the adb folder by holding Shift and Right clicking simultaneously, you will see an option Open Command Prompt Here.
- On cmd, type adb devices and press enter, look for a pop on your device for allowing debugging authorisation for your PC, select always and click Yes.
- Type adb reboot bootloader on the cmd, you will notice that your phone will get into Fastboot Mode!!
- Now we will flash the TWRP recovery that will help us wipe asdf partition, type fastboot devices to show the list of connected devices, currently, your phone should be visible with a serial number.
- Type command fastboot flash recovery twrp-3.2.1-0-Z00L.img, allow it to FINISH, then disconnect your phone and remove the battery.
- Now install the battery again, after that with the key combination, press Volume Down and Power Button together, hold these keys for 3 seconds and release, you will be in TWRP recovery mode.
Wiping ASDF Cache and Flashing Stock Recovery Over TWRP

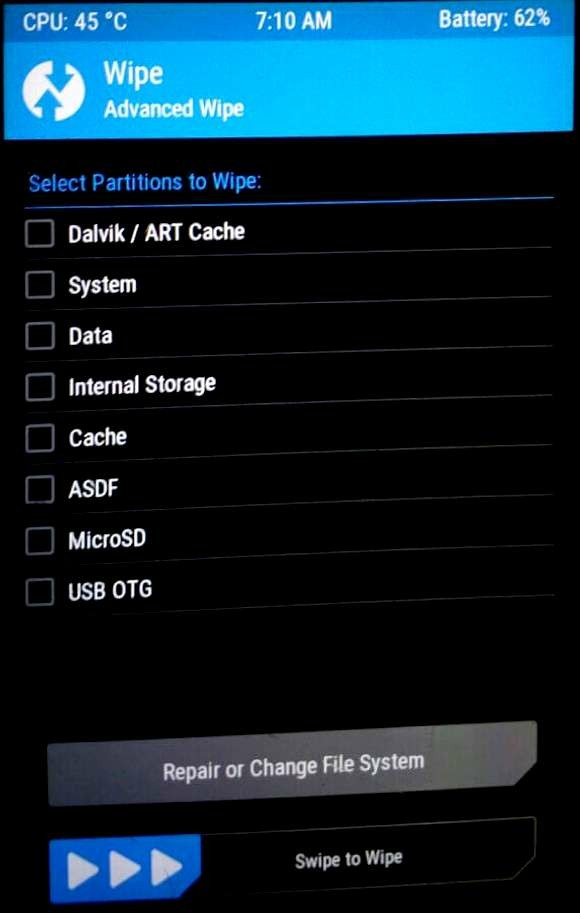
- On TWRP recovery, navigate to Wipe, now select Dalvik/ART cache, System, Data, Internal storage, Cache, ASDF.
- Swipe right to Wipe.
- Since we cannot use TWRP for flashing the desired stock firmware, we will flash Stock Recovery on the phone.
- Disconnect your phone from the PC, unplug the USB cable and remove the battery to turn the phone off, then install the battery again, now boot into the Fastboot Mode!! , this time use Volume Up and Power Button together.
- Connect your phone to PC, again open cmd in the adb folder, now type fastboot flash recovery recovery.img let it FINNISH, similary type fastboot flash boot boot.img again let this FINNISH too.
Apply Update From sdcard
- Now again disconnect your phone, remove the battery and now boot into the stock recovery that we have just installed, (Volume Down + Power Button).
- Go to apply update from sdcard.
- Navigate to UL-Z00L-WW-21.40.1220.2196-user.zip file, and press Power Button to select the file.
- Wait for the process to complete, it may take around 15-20 minutes to complete, so have patience.
- You should be able to get the success message after the system has been patched unconditionally process, then wipe the data/factory and cache partition again to ensure complete cleanup.
Then select reboot system now and wait for the boot process to complete. It may again take 15-20 minutes because, for the first boot, the system optimises the apps and builds the cache. If you don’t have patience, then, of course, you can hard reboot, by long pressing the Power button and restarting the device. (NOT Recommended)
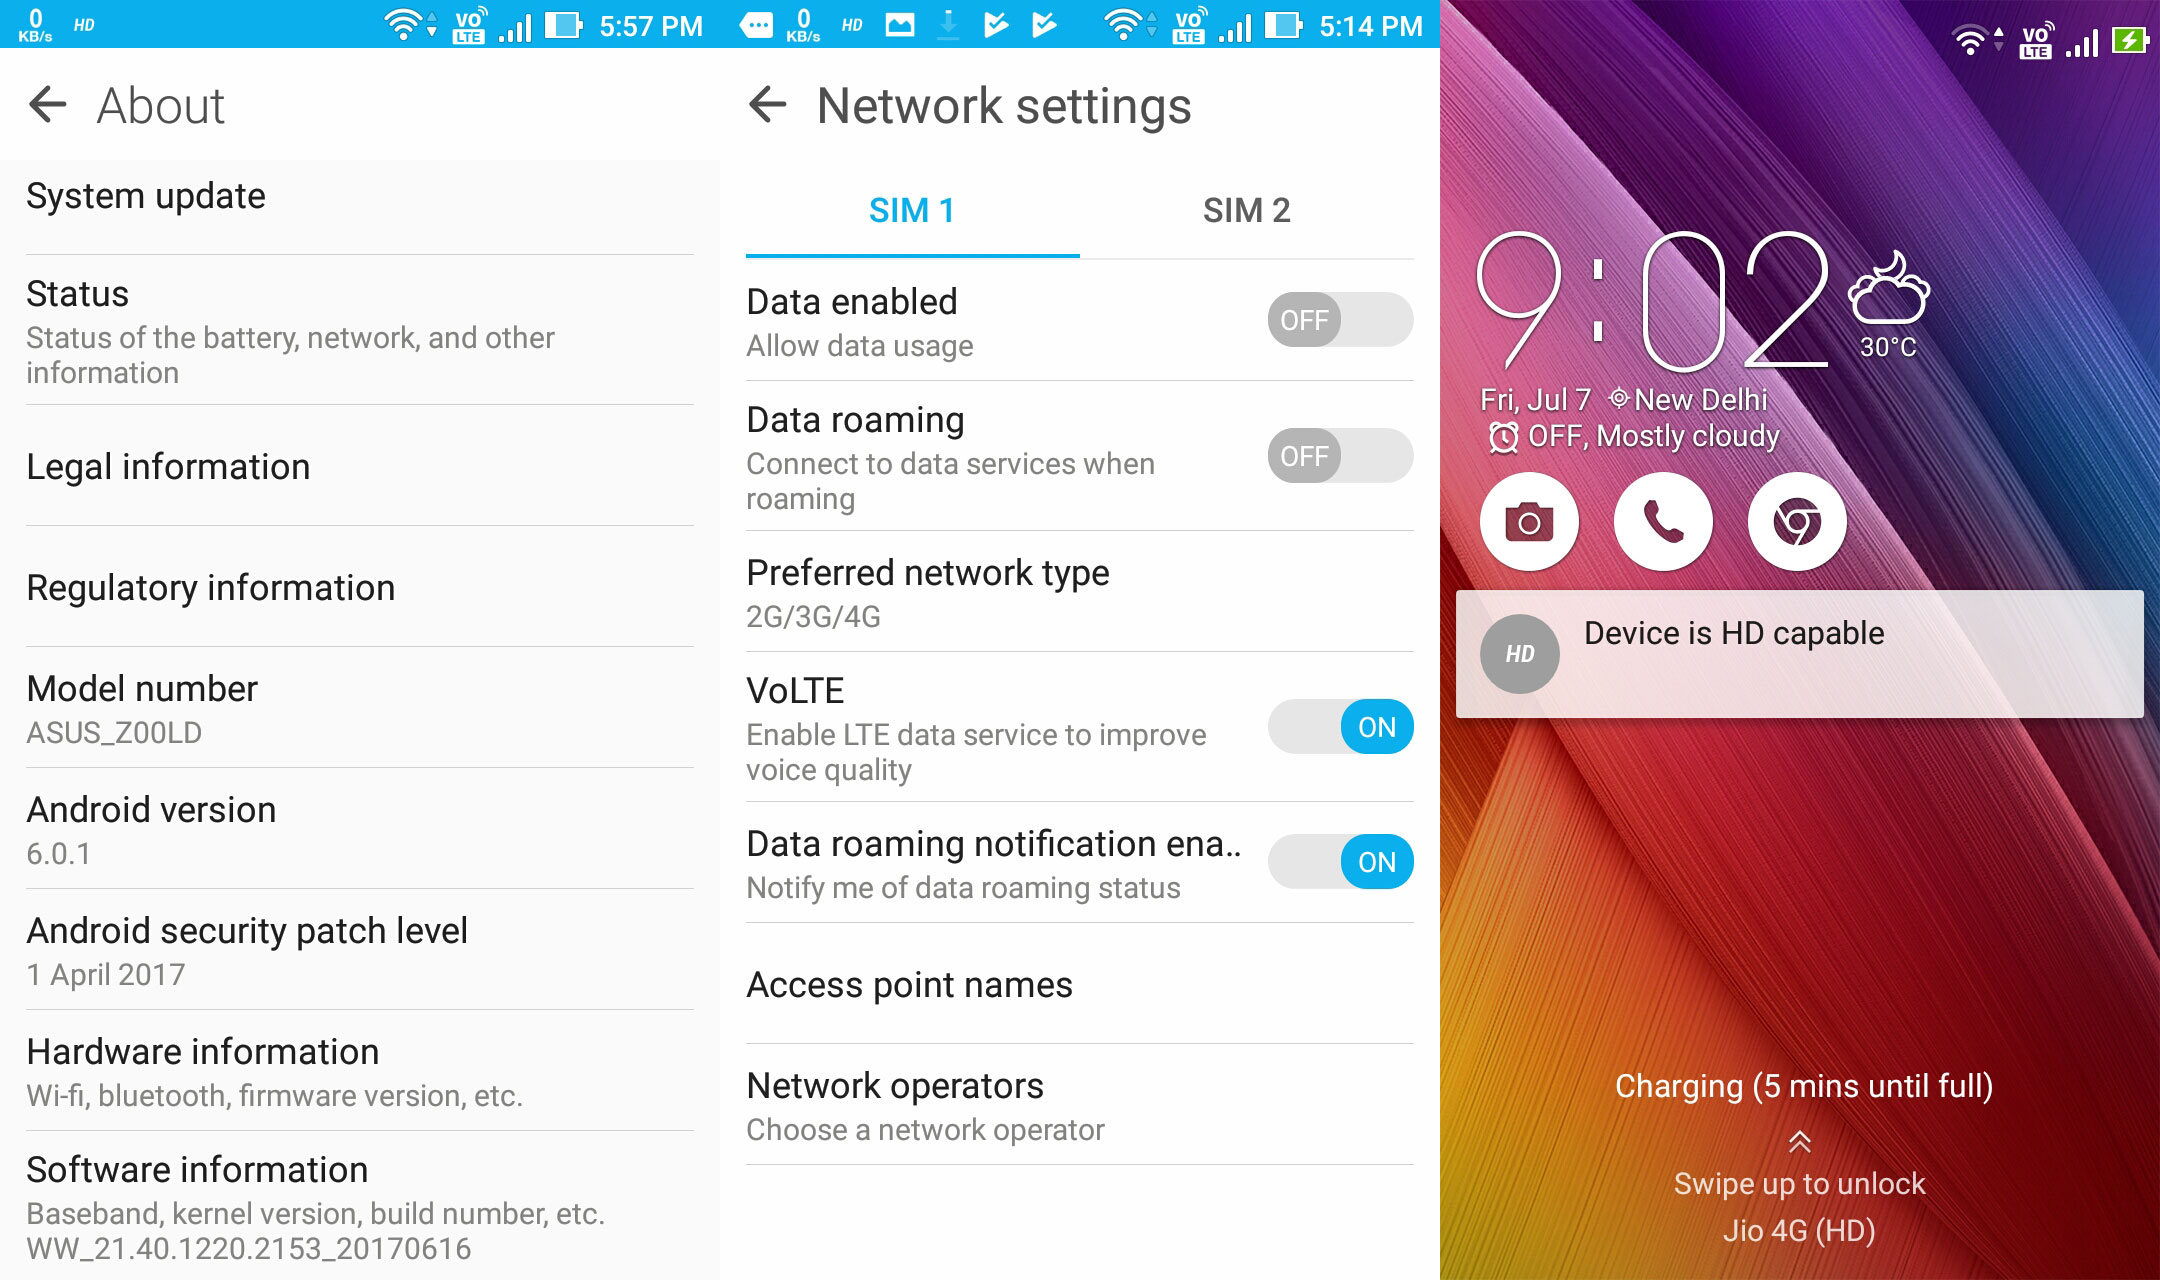
ASUS Zenfone 2 Laser (ZE550KL) after updating:

Note: Test your phone with a 4G enabled network (SIM) to test VoLTE capabilities (for example I used Jio SIM to test VoLTE) and make sure VoLTE option is enabled in Network Settings. This will also help you see a small VoLTE icon in the status area.
I hope you have successfully installed the new update UL-Z00L-WW-21.40.1220.2196-user.zip on your ASUS Zenfone 2 Laser (ZE550KL) device. If not, comment below with your queries or questions. I will be glad to help you.
Useful Links:
- Also Stock ROMs available for Zenfone Selfie here.
- Read more about TRWP, an awesome open source community project here.
- Your ASUS Zenfone 2 Laser (ZE550KL) device specification.
Thank you for reading.
PS: I think you deserve some merriment after performing those exasperating steps, so here is a small joke for you.
